Driver Station
The driver station is one of the most used programs by all teams, so using it should be something that all member should be able to do. This will be a walkthrough of some of it’s basic structures, as well as how to connect to a generic robot and get it driving.
Driver Station Overview
This is what the driver station looks like when first opened:

Enable/Disable
The most important part is the two big buttons in the bottom left corner:
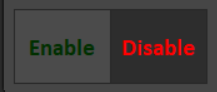
This enables the robot (allowing it to move/be controlled by the driver), or disables it (the default state, it can’t do anything here). You can also enable the robot by hitting [ + ] + , and can be disabled by hitting Enter.
Control Modes
Right above the enable and disable buttons is a list of option. These change what mode you’re enabling when you run the robot.

As you can see, there are four different modes:
- TeleOperated
In this mode, a driver and an operator use joysticks to manually control the robot.
- Autonomous
This mode causes the robot to run a set of pre-coded instructions. There is usually a selector on the dashboard to switch between different autonomous routines.
- Practice
In practice mode, the robot will cycle through the two first modes the way that it would in an actual match, starting with 15 seconds of autonomous, and then the remaining time in teleoperated. These times can be adjusted within the driver station.
- Test
Test mode is used to run additional code that won’t be run in matches.
Indicators
To the right of both previous items is a variety of indicators:
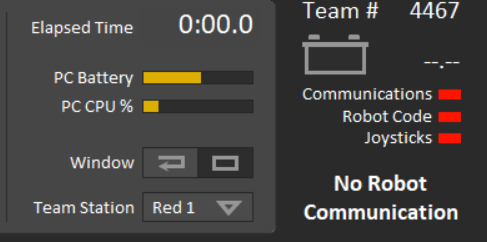
The most important of these include a battery change meter, which shows the amount of battery left in voltage (12-13 is charges, 11.5 or lower is dead), and three indicators that show communication to the robot, if there is running robot code, and weither there is a joystick connected.